Can't find what you're looking for? Get in touch!
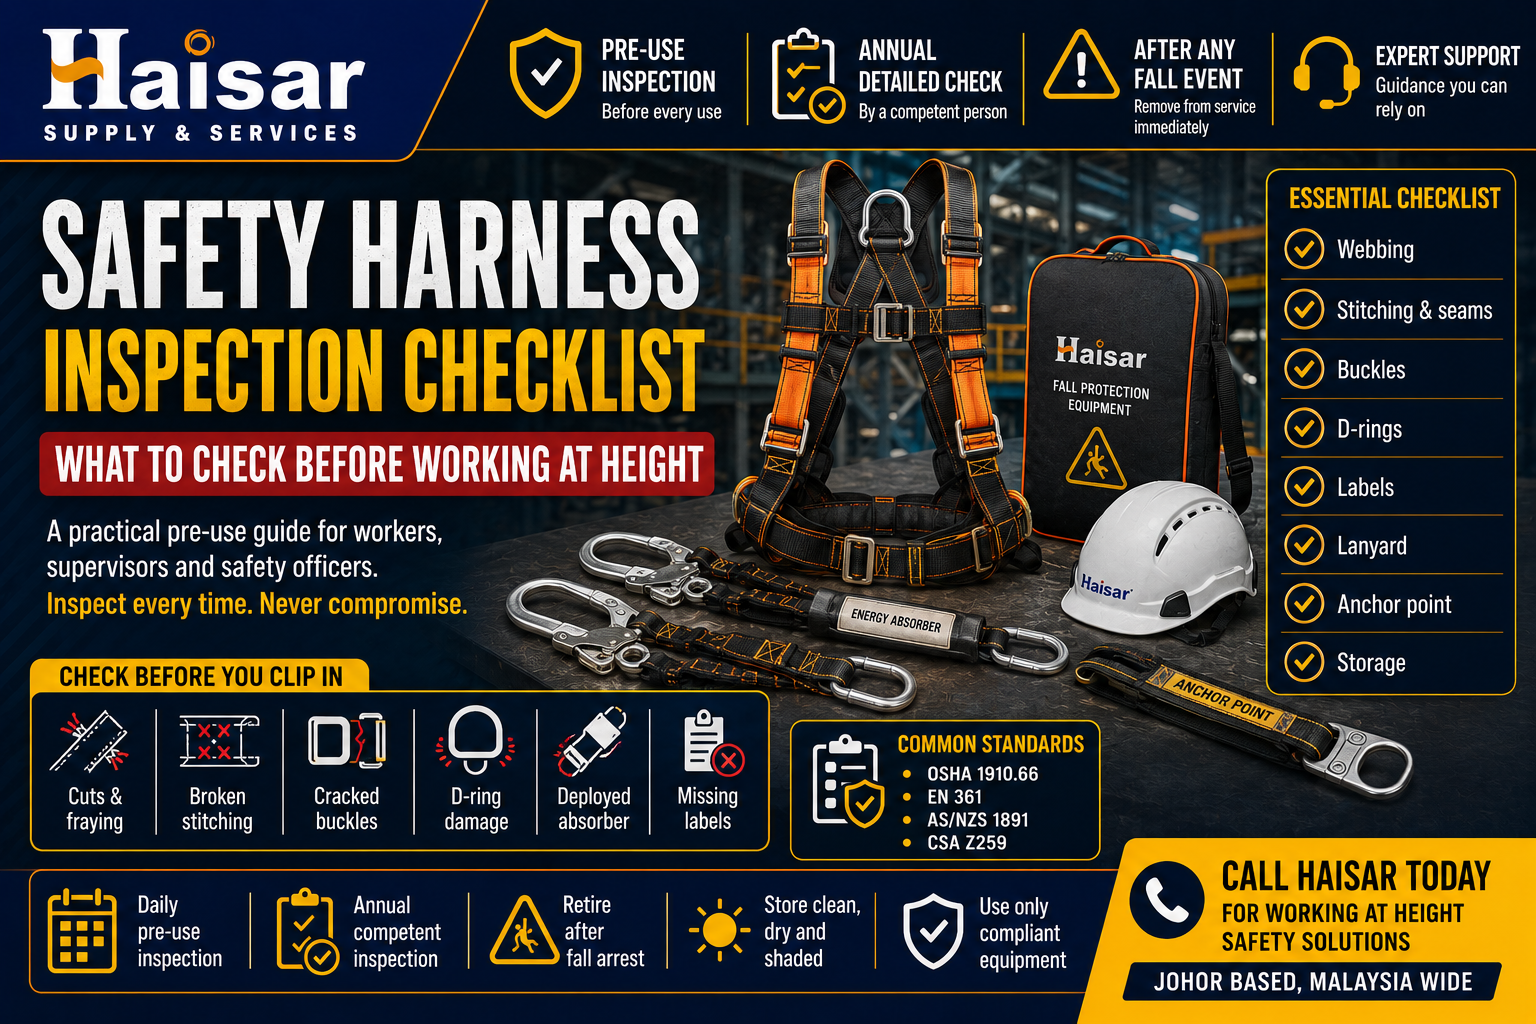
What to Check Before Working at Height ⚠
A comprehensive pre-use guide for workers, supervisors, and safety officers
Every year, falls from height remain one of the leading causes of serious workplace injuries and fatalities globally. Yet many of these accidents are preventable - often through one simple step that workers and supervisors overlook: a proper pre-use inspection of their personal fall protection equipment.
Your safety harness is your last line of defence when working at height. Whether you're working on a construction scaffold, a roof, a communications tower, or an elevated platform, the harness you clip into every morning must be in perfect working order. A single worn strap, a cracked buckle, or a missing label could mean the difference between walking away safely or not walking away at all.
This blog post provides a full, practical safety harness inspection checklist covering every component you need to check - including webbing, buckles, D-rings, labels, lanyards, anchor points, and storage conditions - along with clear guidance on what to look for and when to remove equipment from service.
Let's get started.
Why Inspecting Your Safety Harness Matters
Safety harnesses are not permanent tools. They degrade over time due to UV exposure, chemical contact, physical stress, and general wear. A harness that passed inspection six months ago may no longer be safe to use today - especially if it has been used in a fall event or exposed to harsh conditions.
According to most safety standards - including OSHA 1910.66, AS/NZS 1891, EN 361, and CSA Z259 - personal fall protection equipment must be inspected:
- Before every single use (by the wearer)
- Periodically (at least annually, by a competent person)
- After any fall event or shock load
- After exposure to chemicals, heat, or extreme conditions
Failure to inspect regularly can result in:
- Equipment failure during a fall, leading to serious injury or death
- Non-compliance with workplace safety regulations
- Invalidated product warranties
- Legal liability for employers and supervisors
The inspection process takes only a few minutes. There is no excuse for skipping it.
Who Should Conduct the Inspection?
There are two levels of harness inspection:
|
Inspection Type |
Who Conducts It |
Frequency |
|
Pre-Use Inspection |
The wearer / equipment user |
Before every use |
|
Detailed Inspection |
Competent person (trained safety officer or supervisor) |
At least every 12 months (or per manufacturer specifications) |
Note: After any fall event or serious incident, the harness must be immediately removed from service and inspected by a competent person before being returned to use - or permanently retired.
The Complete Safety Harness Inspection Checklist
Work through each section methodically. Lay the harness on a clean, flat surface with good lighting. Inspect each component individually, running the webbing through your hands to feel for damage you might not be able to see.
1. Webbing Inspection
The webbing is the load-bearing backbone of your harness. It must be inspected in detail — not just glanced at. Run the webbing slowly through your fingers, inch by inch, on both the front and back surfaces.
|
☑ WEBBING — CHECK FOR: |
|
✓ Cuts, nicks, or abrasions — especially along edges |
|
✓ Fraying, broken fibres, or worn areas |
|
✓ Burns or heat damage (glazed or stiff patches) |
|
✓ Chemical damage — discolouration, softening, or brittleness |
|
✓ UV degradation — fading, chalking, or surface cracking |
|
✓ Knots, kinks, or distorted sections that cannot be straightened |
|
✓ Pulled or broken stitching at any seam or load point |
|
✓ Embedded grit, sharp particles, or foreign material |
|
✓ Any section that feels unusually stiff, soft, or different from the rest |
|
❌ RETIRE IMMEDIATELY IF: Any cut penetrates more than 10% of the webbing width Webbing shows signs of heat glazing, melting, or chemical attack You can see or feel any structural compromise along a load-bearing section Multiple areas of minor damage cluster together |
2. Stitching and Seams
Stitching holds the webbing together at critical stress points. Damaged stitching is one of the most common and most dangerous harness defects - and it can be easy to miss on a quick glance.
|
☑ STITCHING - CHECK FOR: |
|
✓ Broken, cut, or missing stitches at any join or loop |
|
✓ Pulled or loose threads that indicate stitch failure |
|
✓ Discolouration or hardening of thread (indicating chemical or heat exposure) |
|
✓ Uneven or puckered stitching that was not there originally |
|
✓ Bar tack integrity at leg loop connections and dorsal D-ring attachment points |
|
✓ Load indicator stitches (if fitted) - if these have broken, the harness has been shock-loaded |
Pro Tip: Many modern harnesses feature load indicators — brightly coloured threads sewn into the dorsal attachment area. If these threads are visible or broken, it means the harness has experienced a fall arrest load and must be taken out of service immediately, regardless of visible damage.
3. Buckles and Adjustment Hardware
Buckles must open, close, and lock correctly every time. Test each buckle individually with firm, deliberate movements. Do not accept any buckle that does not click positively into place or that releases with less effort than normal.
|
☑ BUCKLES — CHECK FOR: |
|
✓ Distortion, bending, or cracking of the buckle frame |
|
✓ Corrosion, pitting, or rust on metal buckles |
|
✓ Positive engagement - buckle should click firmly and hold under tension |
|
✓ Correct release function - buckle should release cleanly when the tab is lifted or button is pressed |
|
✓ Plastic buckle integrity - no cracks, chips, or brittle sections |
|
✓ Roller bars on pass-through buckles - should spin freely without grinding |
|
✓ Self-locking function on auto-locking buckles - test that the mechanism engages |
|
✓ Friction buckle tension - should hold adjustment firmly without slipping under load |
|
✓ No sharp edges, burrs, or rough areas that could damage webbing |
|
❌ RETIRE IMMEDIATELY IF: Any buckle does not engage or disengage correctly Metal shows corrosion that cannot be cleaned off Any crack is visible in a plastic or alloy component Buckle releases under tension without intentional operation |
4. D-Rings and Connection Points
The dorsal D-ring is the primary attachment point for your lanyard or self-retracting lifeline. It carries the full force of a fall arrest load - which can reach 6 kN or more - and must be in perfect condition every single time.
|
☑ D-RINGS - CHECK FOR: |
|
✓ Distortion, bending, twisting, or elongation of the D-ring shape |
|
✓ Corrosion, rust, pitting, or surface erosion |
|
✓ Cracks or fractures in the metal - inspect the full circumference |
|
✓ Burrs, sharp edges, or rough surfaces |
|
✓ Free movement - the D-ring should rotate and pivot freely in its keeper |
|
✓ Keeper (retaining bar) - must be present, intact, and seated correctly |
|
✓ Loose or missing rivets on the D-ring attachment plate |
|
✓ Condition of the webbing loop or attachment plate securing the D-ring to the harness |
|
✓ Chest and sternal D-rings (if present) - apply the same checks |
The dorsal D-ring should sit between the shoulder blades when the harness is worn correctly. A D-ring sitting too high (above the shoulders) or too low (below the waist) indicates the harness is incorrectly sized or adjusted.
5. Labels and Identification Tags
Labels are not just administrative paperwork - they carry critical safety, compliance, and traceability information. A harness with an unreadable or missing label cannot be confirmed as compliant and should not be used.
|
☑ LABELS — CHECK FOR: |
|
✓ Manufacturer name and product model/serial number — must be legible |
|
✓ Standard compliance markings (e.g., EN 361, AS/NZS 1891, ANSI Z359, CSA Z259) |
|
✓ Manufacture date - critical for calculating service life |
|
✓ Maximum user weight rating - ensure user is within limits |
|
✓ Inspection record label - check that periodic inspections are current |
|
✓ Retirement date (if marked by manufacturer or company policy) |
|
✓ Any user-added labels, markings, or paint that may obscure original information |
|
✓ Labels should be firmly attached - not peeling, faded beyond readability, or missing |
Important: Most manufacturers specify a maximum service life of 10 years from the date of manufacture, regardless of use and condition. Some specify shorter periods (5 years for harnesses used in harsh conditions). Always check the manufacturer's guidelines and your company's retirement policy.
If a label is missing or unreadable, the harness cannot be verified as compliant. Remove it from service until the label can be replaced by the manufacturer or the unit is retired.
6. Lanyards and Energy Absorbers
Lanyards connect your harness to the anchor point and, in a fall, work with the energy absorber to limit the forces on your body. They must be inspected with the same rigour as the harness itself.
|
☑ LANYARDS — CHECK FOR: |
|
✓ Webbing or rope condition - apply the same checks as harness webbing (cuts, fraying, burns, chemicals) |
|
✓ Snap hooks and carabiners - gate must open smoothly, lock positively, and not cross-load |
|
✓ Auto-locking gate function - confirm it locks automatically after closure on every hook |
|
✓ Gate keeper nut (if screw gate) - fully tightened and seated |
|
✓ Swivel function - should rotate freely without binding |
|
✓ Energy absorber (shock pack) - must be intact, with no tearing of the outer cover or evidence of deployment |
|
✓ Deployed energy absorbers - if the pack has opened, the lanyard must be retired immediately |
|
✓ Double-leg lanyard - inspect both legs and both connection ends |
|
✓ Connecting elements (rings, maillon rapide) - check for distortion, corrosion, and correct closure |
|
✓ Self-retracting lifelines (SRLs) - pull the line out fully and let it retract; should retract under even tension with no jerking or locking |
|
❌ RETIRE IMMEDIATELY IF: Energy absorber pack is torn open or shows any sign of deployment Any snap hook gate does not lock positively Any lanyard webbing shows cuts, chemical damage, or significant wear SRL does not retract smoothly or locks unexpectedly during pull test |
7. Anchor Points
The anchor point is what connects your entire fall protection system to the structure. Even a perfect harness and lanyard will fail if the anchor point fails. Anchor point integrity is every worker's responsibility before clipping in.
|
☑ ANCHOR POINTS — CHECK FOR: |
|
✓ Load rating - must be rated for at least 15 kN (3,360 lbf) per person connected (check local standards) |
|
✓ Structural integrity - anchor must be fixed to a load-bearing structural element, not cladding, handrails, or services |
|
✓ Corrosion, distortion, or physical damage to the anchor itself |
|
✓ Correct installation - no improvised or field-fabricated anchors unless engineered |
|
✓ Positioning - anchor should be at or above shoulder height where possible to minimise free-fall distance |
|
✓ Clearance below - confirm enough clearance exists beneath the work position for the lanyard and energy absorber to deploy fully |
|
✓ Swivel and connector function on permanent anchors |
|
✓ Temporary anchor suitability - is this anchor rated for fall arrest, or only for restraint? |
|
✓ Horizontal lifeline (if used) - check tensioner, intermediate supports, and end connections |
Never assume an anchor is suitable. If you are not certain of its load rating and structural attachment, do not clip in. Consult your supervisor or a competent person.
8. Storage Conditions
Poor storage is one of the fastest ways to degrade a perfectly good harness. UV exposure, chemical fumes, heat, moisture, and compression can all weaken webbing and components even before the harness is ever used for the day.
|
STORAGE — CHECK FOR: |
|
✓ Correct storage location - cool, dry, and away from direct sunlight or UV sources |
|
✓ No hanging in direct contact with chemicals, battery acids, solvents, or paint |
|
✓ Not stored compressed under heavy equipment or folded tightly for extended periods |
|
✓ Harness bags or storage hooks in good condition and free of contamination |
|
✓ No pest damage - rodents can chew through webbing without obvious external signs |
|
✓ Separated from sharp tools, abrasive materials, and welding equipment |
|
✓ Not stored in vehicle boots or exposed outdoor areas long-term |
|
✓ Harness condition on first access - musty smell, mould, or damp can indicate moisture damage |
|
✓ Inspection log - confirm the harness was inspected and stored properly since last use |
Harnesses should be stored on wide, smooth hangers (not hooks that pinch webbing) in a bag or dedicated cabinet. After each use, allow the harness to air-dry fully before storage if it is wet.
Quick-Reference Checklist Summary
Use this summary table as a rapid on-site checklist before every use. For detailed inspection criteria, refer to the sections above and your manufacturer's documentation.
|
Component |
Key Points to Check |
Pass / Fail |
|
Webbing |
Cuts, fraying, burns, UV fade, chemical damage, stiffness |
☐ Pass ☐ Fail |
|
Stitching & Seams |
Broken threads, loose stitches, load indicator status |
☐ Pass ☐ Fail |
|
Buckles |
Engagement, release, corrosion, cracking, roller function |
☐ Pass ☐ Fail |
|
D-Rings |
Shape, corrosion, cracks, keeper present, free rotation |
☐ Pass ☐ Fail |
|
Labels |
Legible, compliant standard, manufacture date, within service life |
☐ Pass ☐ Fail |
|
Lanyard |
Webbing, hooks, gate lock, energy absorber integrity |
☐ Pass ☐ Fail |
|
Anchor Point |
Load rating confirmed, structural attachment, clearance below |
☐ Pass ☐ Fail |
|
Storage |
Clean, dry, no UV or chemical exposure, log current |
☐ Pass ☐ Fail |
When to Retire a Safety Harness
Knowing when to retire equipment is just as important as knowing how to inspect it. A harness must be retired from fall-arrest service immediately if any of the following apply:
- It has been involved in a fall event or experienced a shock load
- Any component fails inspection - webbing, buckle, D-ring, stitching, or lanyard
- Labels are missing or unreadable and cannot be replaced by the manufacturer
- It has exceeded the manufacturer's stated service life (typically 10 years from manufacture)
- It has been exposed to chemicals, heat, or conditions that cannot be fully assessed
- A competent person has condemned it during a periodic inspection
- The harness has been used as anything other than personal fall protection equipment
When you retire a harness, destroy it so it cannot be accidentally returned to service — cut the webbing or write CONDEMNED across it prominently. Record the retirement in your equipment log.
A Note on Training
Inspection skills are not instinctive - they need to be taught. Workers should receive formal training in how to inspect, fit, and use their personal fall protection equipment before they use it for the first time, and refresher training at regular intervals.
Supervisors and safety officers should be trained as competent persons under the relevant national standard so they can conduct and sign off annual detailed inspections.
No checklist replaces proper training - but used together, they create a powerful safety culture where falls from height become genuinely rare.
Conclusion
Working at height is inherently high risk. Your safety harness is engineered to save your life — but only if it is in the right condition when you need it. A thorough pre-use inspection, carried out properly every single time, is one of the most important safety habits you can build.
Use this checklist every morning before you clip in. Share it with your team. Post it in your site office. Make it part of your daily routine - because the few minutes it takes could be the most important few minutes of your day.
Stay safe. Inspect every time. Never compromise.
© 2024 | Safety Harness Inspection Guide | For informational purposes. Always refer to manufacturer guidelines and applicable local standards.